shop tutorials recipes fitness links about me home Image Map
Showing posts with label projects. Show all posts

25 December 2015

Simplicity Pattern 1921: Simply Baby


Since I was too busy for my sister-in-law's baby shower to make a gift this year, I decided to make her an outfit for Christmas. I decided to make it red and black since my sister-in-law and her husband are both Red Raiders (and I didn't think she'd put Evynn in a maroon outfit .... )

I decided to do Simplicity Pattern 1921.  I chose option B and E, the dress and little undies to go with it.


One of the most tedious parts of sewing is pinning the patterns to the material and cutting them out. I hate this part of the process...so of course I had to take a picture of the pattern pieces after I finished cutting them out.


The hardest part about this pattern to piece together was the collar. It involved rickrack, and the instructions for this part made absolutely no sense. I pretty much stared at the paper for an hour before I threw them down and just figured it out on my own. But I think that it turned out pretty nice.


I also added the rickrack to the bottom of the dress like the pattern called for. At first I didn't think I was going to do it, but I figured why not? I had the extra rickrack.


The bloomers ...


The zipper was also sort of hard to put in. I tried to use my zipper foot. I'm just not very good at zippers. But I guess that practice makes perfect right??


Here is my sister-in-law, Stephanie opening her gift! I don't think she realized at first that I made it, so I was pretty proud ;)


11 October 2014

Katniss Cowl Version 2.5

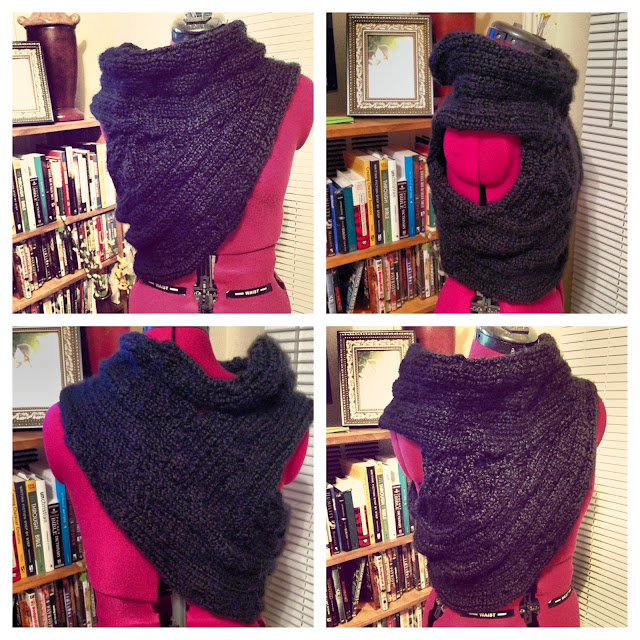
So I'm finally getting around to posting pictures of this project. Last Christmas, I made this scarf/cowl based off the one that Katniss wears in the Hunger Games second movie. 

Then a little bit after Christmas, I decided that I could do it much much better, so I tried again, this time with grey yarn close to the one she wears in the movie. 

That one, version 2.0 turned out pretty good, but I am still not happy with the way it was turning out (I still haven't finished it ...) so I gave up. 

And then one night I was looking at some yarn that my sister gave me for Christmas last year and I thought to myself, this would make a pretty chunky scarf or something. So I started just playing around, and it turned out that I was making the Katniss Cowl version 2.5. 

Here is what I ended up with:


It doesn't look exactly like the one she wore in the movie, but I think its pretty darn close! I think that I learned a lot by making this one. I had figured out some things that I don't think I was doing right in version 2.0, and this one is more of one continuous piece. I even figured out how to shape the thing! I was pretty proud of that ... even though I am fairly certain that I did not do it the correct way.

But who cares, I ended up with something that I'm sort of proud of.

One of these days, I'll go ahead and finish up version 2.0 and post some pictures of that one.

02 December 2013

Crochet Infinity Scarves For Sale


I've been getting a few comments and likes on the crochet infinity scarf I posted on Facebook last week, so I decided to make a listing for them in my Etsy shop! Check it out and let me know if you would like one.

I can make them to order so if you have a particular color you've been looking for let me know and I'll see what I can do!


19 November 2013

Hunger Games Cowl/Neck Scarf


Last week I was perusing Pinterest, when I came across a video about finger-knitting. It is actually really easy. I had some black yarn and was trying to think of something to do with it when I came across another picture on Pinterest. The cowl/scarf thing that Katniss wears in the new Hunger Games movie! 

I decided to try and make my own...I think it turned out well, but it's not perfect. 

I may buy some more yarn and give it another go after Christmas...I may try and find one of those knitting looms to help me out. I think I may be able to figure that out (I have tried to knit before and it is too complicated). 


12 October 2013

Simplicity Pattern #1663 Option D


I finally finished my first pair of pants! I used Simplicity Pattern #1663, option D. 

Overall I guess I'm happy with how they turned out...there are a few things I wish were better. I used my serger to finish all the seams which was awesome!! I am definitely glad I made that purchase :) 

I like the pants, they remind me of those palazzo pants, and they're comfy enough to lounge around in. 

The fabric I used is 100% rayon, so it is slightly stretchy but not much and it's sort of flowy. 

I ended up lining the pants with another layer of the rayon because I felt like one layer was just not thick enough. This way the legs of the pants are heavier and sit better. 

The waistband is elastic so they are easy to get on and off and it makes them that much easier and more comfortable to wear. 

I even used my serger to make a blind hem at the bottom! 


16 September 2013

Baby Shower Guest Book


For the baby shower, I was asked to do something creative for the guest book. I looked on Pinterest for a long time trying to come up with cute ideas. I wanted it to be something that my friend would actually use somewhere. I didn't like the idea of framing a picture with a mat around it that everyone signs, I didn't like the idea of a signature quilt...but I wanted to make something for the baby room.

Rachel told me that the theme was jungle. I came across this pin on Pinterest and I liked the idea of everyone signing something that will become part of the picture, so I started brainstorming and I came up with a giraffe with signatures on the spots!

I think it turned out so cute. I cut the giraffe out of construction paper. I also included a bible verse (Psalms 127:3) so that whenever Rachel looks at it she'll remember that her baby is a gift from God.

:)

The only thing that I forgot to do was to put the date somewhere on the picture...maybe when the baby comes, Rachel can put his birthday on it or something in the corner.


New Look Pattern 6198 by Simplicity


I had a wonderful time this weekend in Houston for my friend's baby shower! It was great to get back and see all my old friends that we had to leave behind when we moved to Midland a few months ago.

Anyway, for my gift, I made a little romper (New Look 6198) with a pocket on the front and a cute little stuffed animal giraffe (Simplicity 2613).

The romper is made out of a gingham print duck cloth, I believe. It's 100% cotton. I didn't make any alterations to the pattern at all! I cut the largest size that the pattern came with.

For the most part, I had no trouble at all with this pattern. The only thing that was difficult was the snap tape at the bottom...in Midland (although I haven't ever looked for it anywhere else before) snap tape is impossible to find. I looked everywhere I could think of.

So I ended up making it myself. I used these snaps from Walmart and fashioned my own snap tape out of it. I guess that I should have made the tape a little bit wider because it was very hard to sew around the snaps. It's all jacked up down there.

I think the instructions said something about using an adjustable zipper foot, but I don't have one of those, so I had to just do the best I could with what I had!

Overall, I think that it turned out really cute!

11 September 2013

Simplicity Pattern 2174 Style 'C'


I really enjoyed making this dress! It was my first go at this pattern, and I have to say that it was really easy to follow the pattern instructions. The only things I had trouble with were the sleeves and the zipper. One sleeve poofs up more at the top of the shoulder than the other...I tried re-sewing the poof-ier side once, and it looks a little better, but it is still off a little bit but I'm hoping that it's not too noticeable. And the zipper took me FOREVER to put in, and I still don't think it's as clean as I'd like it to be. I think that part of the problem was that I used one of those fashion zippers with the metal teeth and I should have used the invisible zipper instead. The invisible zippers are smaller and easier to sew on.

The material is 100% cotton duck cloth. It frays really bad at the ends, so to finish the seams on the inside, I first trimmed all the seams and then zig-zagged along the edges twice.

Seams will be a lot easier and faster for me once my brand new Brother 1034D serger arrives! (I spoil myself...)

Alterations to the original pattern:

    - Went from size 8 at the top to size 12 at the underarms to size 14 at the waist

My next project will be these pants! (View A)


03 September 2013

A Learning Experience...

Over the weekend, I worked a lot on my sewing. 

Last week, I made a practice dress out of muslin that I bought a while ago from JoAnn's (back when we still lived in Houston). I had also bought a whole bunch of patterns when they were on sale and one of them was Simplicity Pattern No. 1652. It's part of their Amazing Fit collection, an A-line dress with a scoop neck, full back, & slightly gathered skirt with in seam pockets. You can make the dress to have cap sleeves or short sleeves, and you can even make a peek-a-boo back cut-out if you want.

Then, a couple of weeks ago, I got some fabric on sale from Hancock's here in town and I thought it would make a really pretty dress. This is the first dress I've ever really attempted so I decided to practice the pattern out in the muslin fabric first. 

Let me just tell you that this has been a learning experience. 

First I cut out the pattern in the size I thought I needed based on my measurements and the back of the pattern. When I got it all sewn together, it fit pretty nicely around my waist, but the top was too big. I put the dress on my dress form that has roughly the same measurements as I do, and started pinning it to where it would fit.

First of all, the back of the dress was too loose at the top so I pinned the extra fabric to where it was as tight as I wanted and marked it with a washable fabric pen. After I finished marking it on the muslin, I laid it out as flat as I could and transferred the marks to the pattern. 

Next I ripped out the threads where I needed to take the back in and sewed it back where I had the marks and then tried it on again. The top of the dress still didn't fit. It was too long in the front so I pulled up the shoulders a little bit and then pinned them to where the dress fell where it was supposed to and did the same process of transferring the marks to the pattern. 

Then was time to sew on the sleeves. They fit pretty nicely once I was done, so I didn't change them at all...until later.


I decided to make another practice run at the bodice of the dress since I had now altered the pattern pieces and I am glad I did!

After looking at the marks I had made on the pattern pieces, I changed them up a little bit. At first, I had just marked the patterns where I had put the new seams on the tester, but to make things easier for myself, I decided to cut out the size that most closely matched the original patterns. 

On the top around the neckline, my marks were closest to size 8, so I decided to start there. Since I didn't take in anything around the waist, I knew that it needed to go from size 8 at the top to size 14 at the waistline. The best way for me to do it was to go from size 8 at the neck and shoulders to a size 12 underneath the armpits and to a size 14 at the bottom. So I drew new lines on the patterns connecting them all together and then cut out the new pattern!

The skirt on the dress fit just fine for me, so I didn't make any changes to that part. 

I made another practice run out of an old fitted sheet that we don't use anymore...and in the end I turned it into a shirt by shortening the skirt so it's more of a peplum type top. 

The new bodice fit pretty well, except for the sleeves...they were way to tight. I had a heck of a time trying to get those stupid sleeves to fit (and they still don't...still too tight but it is wearable). I think I cut out about 10 different sleeves. 

I ended up cutting the sleeve pattern up and then adding more to it to add more wearing ease following a method that I learned from a book I bought a while back that talks about normal fit issues when using a pattern and how to change them up.


Anyway, after all was said and done, that's what I ended up with. I finally made it fit decently, and then I decided not to use that pattern with the original material I bought. LOL!

I had gone back to the fabric store over the weekend and they had all the patterns on sale for $1.99 so I got to looking at them, and I started talking to a lady there that was also looking at patterns, and I told her I was trying to make my first dress, but I was unsure that the pattern I bought would work with the material I had.

I am afraid that if I try this dress with the gathered skirt with the material I bought (which is 100% cotton duck cloth) that it wouldn't work, and I think she agreed with me. She said that the softer the fabric, the smoother it will lay and the duck cloth isn't very soft.

I think I'll have to buy a softer and flow-ier material for that one. I also bought a bunch of new patterns, and one is a dress that I think may work with my material.

It's Simplicity Pattern No. 2174.  I started cutting out the pattern pieces last night (I traced them onto tissue paper first so I wouldn't screw up the original after the lady I met told me that's what she does and it made sense to me). She told me that all the Simplicity patterns are generally about the same size, so I'm assuming that this dress will fit me like the tester I made, so I marked up the patterns the same way I did for the other one and I'm just hoping that it will work.

We shall see!

14 August 2013

Wilton Method of Decorating Cakes: Session TWO

Well, the second session of my cake decorating class was....OK. And I only say that because I had planned to decorate a 2 layer cake, but after all was said and done, it turned out to be only 1 layer. Frosting the top and sides of the cake and making it nice and even is HARD. Especially if you have a lot of crumbs you are dealing with.

So first things first. I made my cake from scratch using this recipe that I found on Pinterest. I had never baked a cake before that called for soda pop in the recipe and I thought it sounded good! I used a Zevia coke instead of real coke because their is ZERO sugar and ZERO calories!!!

For the frosting, I made my own buttercream (it is soooo good) using this recipe:

1 cup butter (I use the Land-O-Lakes brand)
1 pound of pure cane powdered sugar
1 1/2 tsp vanilla extract
1 tbsp meringue powder 

First, cream together the butter and vanilla extract, then slowly add the powdered sugar and meringue powder until combined! 

I went ahead and made two batches of the icing.

Now for the cake, note that if you are planning on making a 2 layer cake, the batter should be spread evenly between the two pans. At first, I was only planning on working with one layer of cake (I used a 2" thick cake pan and was planning on cutting it into two 1" layers in class), but then I had a lot of batter left over so I decided to just bake a second layer. 

In the first class, the instructor told us that it works better if you bake the cake at 325 degrees instead of 350 degrees.

I didn't have the same amount of batter in each pan and so the second one did not get as big as the first one, as you can see below. 


This is how my cakes turned out! The one on the bottom is the one I ended up using for class.

In class, I learned that one of the most critical things to get right when icing a cake is to get the consistency of the icing right! 

The top and sides of the cake should be iced with medium-stiff icing. By the time I got to class and had worked with my icing to make it smooth again (I had stored it in the refrigerator and so it was hard), it was too soft, so I had to add a LOT of powdered sugar to it to make it stiffer. If the icing is too soft, it will pick up the crumbs off the top of the cake and it will not dry as fast. 

I didn't want to waste cake, so I saved the layer I didn't end up using and smeared the last of my green frosting on top. It's not very pretty, but it doesn't taste half bad. I had bought a lemon creme pie filling to put in between the two layers so there is some of that in this cake. 

The one I decorated doesn't have any filling.

:(


Ta-daa!! Here is the finished product!

(In case you are wondering, it's a cup-cake with green frosting and a purple base...STACI)...

11 August 2013

Chevron Backpack


This weekend I decided that it was time I had a new project. I found this tutorial and thought it looked easy enough. I think it turned out pretty good, I am not completely happy with the top drawstring...I thought that it would work out differently.

Usually, I'd just rip it out and re-do it, but it took me forever to sew the band on the top of the bag and so I will just live with it how it is.

Other than that, I am really happy with the way it turned out!

For the outside, I used a chevron print duck cloth fabric from Hobby Lobby, and for the bottom piece and the liner I used a faux leathery fabric.


This was a fun little project! I love bags, and especially backpacks. 

I can't wait to take it out somewhere. 

07 August 2013

Wilton Method of Decorating Cakes: Session ONE


I went to the first session of my cake decorating class this past Monday.

My take on the class was that it was slightly boring/disappointing, although I did learn a lot of information that I didn't know before about how to bake a cake, and the differences between icing consistencies (like if you want to write letters with the icing, you need a softer consistency and if you want to make petals or something like that, you want a firmer consistency). 

Towards the middle of class, we learned how to prepare the icing bags and the different tips you can use to make different designs. She also went over how to hold the bag and different hand positions to use when you make different designs. 

And at the end of class came the fun part! We got to practice decorating sugar cookies that we were all supposed to bring with us to class. 

The different techniques we learned in session 1 were stars and dots. I think that my stars are pretty good (they are not very hard), but my dots could use a little bit of work. It's hard to get them smooth on the top and still look like a dot. 

I am looking forward to the second class because we were all given homework to bring a cake with us next time to practice on! We are also supposed to prepare our own icing to use. We are going to practice cutting the cake in to two layers to put a tasty filling in between the layers. 

We each got course booklets to review, and there is a recipe for icing in there that we're supposed to use. However, it calls for vegetable shortening (Crisco) and I refuse to use that. Hello, the name of the recipe is Butter cream Icing. Last time I checked, Crisco isn't butter. 

So I will be modifying the recipe. It tastes better if you use real butter anyway. For the first class, we used the Wilton brand ready to use icing. I had never used Wilton brand icing before, and I do not like how it tastes.

I asked the instructor if that would be alright to use butter instead, and she said that it would be fine but I may need to add extra sugar to make it the right consistency.

Whatever, more sugar is like my middle name.


29 July 2013

Chevron Quilt Tutorial


This weekend was my sister-in-law's bridal shower in Sherman! She told me that she really wanted a hand made quilt, so I decided to make one for her. She told me that she really likes grey and white chevron, so that's what I decided to do. I made the back a dark navy blue. It turned out to be the best quilt I've done to date (this is only my 3rd one).


Here is a mini-how-to for this quilt:


First of all, I used 80 (9" by 9") squares (10 rows of 8). I think the finished quilt was about 76" x 72" (these aren't exact dimensions because I can't remember for sure!

So, on to the how-to:

(1) 

First things first! ALWAYS pre-wash your material. Right after I got home from the fabric store, I threw my material into the washing machine. When it's done washing, I throw it in the drier with a fabric softener sheet to make it nice and soft. When the material is dry, iron all the wrinkles out. 

Note: make sure you don't wash lights and darks together in case they fade/stain the lighter colors!

(2) 

I figured out a much quicker way to cut out the squares this time around. For the first quilt I ever made, I used fat quarters and I cut out all the squares individually. This time, after ironing the fabric, I started folding the material over and over again until I got it down to a nice square. (If you do it this way, be sure to flatten out all the layers so you don't have folds in the middle of one square when you're done.)

Once the material is all folded up, lay a 9" by 9" square piece of tissue paper on the top and pin. Next, use the rotary cutter to trim off the edges. You should be left with a nice pile of uniform squares.

Maybe I'm a moron for not figuring out how to cut squares like this sooner, but I felt like I had a revelation when I finished cutting squares in about 10 minutes instead of 2 hours!

(3)

Once all the squares are cut, stacked one grey square and one white square on top of each other, pin them together, and then draw a straight diagonal line from one corner to the opposite one, creating two triangles. Next, sew two straight lines on each side of the diagonal (see below).

Next, take the rotary cutter and cut on the drawn diagonal. When you unfold the pieces, you should have two squares with a grey triangle on one side and a white triangle on the other (see below).

(4)

Arrange the squares in the pattern you want for the top of the quilt. Sew blocks together to form 10 rows in the pattern you have selected. Sew individual rows first, then combine them.


This is what my rows ended up looking like. Note, every other row will have a slightly different pattern in order to make the chevron. When you sew all the rows together they should look like this:

(5) 

Once the top of the quilt is sewn together, lay out the material for the bottom of the quilt and pull tight so there are no bunches in the material. Next roll out the batting, and then lay the top over that. 

Carefully start safety pinning the layers together. I start by first pinning the corners and then working my way down the sides and then fill in the middle, but it's really up to you however you find this easiest. 

(6) 

Once all the pins are in place, roll the edges of the quilt to make it easier to fit into your sewing machine. You can do whatever pattern you like for the quilting, but no matter what pattern you do, you should start somewhere in the middle of the quilt and sew outwards making sure all the layers are flat under the needle so they don't bunch up.

For the stitching on this quilt, I did a little pattern on the grey stripes, and I left the white blank. Here's what I did:


(7) 

After you've done all the quilting your little heart desires, cut all the strings where you picked up the needle, and then take a straight edge down the side of the quilt and cut off all the excess batting to make a nice straight edge on all sides of the quilt. 

(8) 

Cut strips for the binding 2 1/2" thick to go around the perimeter of the quilt. Always cut extra so that you have enough binding to turn the corners.

Once you cut the strips and sew them all together in a continuous string, iron it in half longways and sew it to the quilt! You may need to find a tutorial to teach you how to attach the binding. I don't find it to be that difficult, but the first time you do it can be tricky.

(9) 

You are done!! Happy quilting!